Introduction
A few months ago I have posted an article about Amazon Web Services Redshift – Amazon’s Data Warehouse solution in the cloud. XtremeData dbX is a similar massive parallel SQL database engine that can be run on-premise as well as in the cloud. It is a purpose-built high-performance and scalable solution for data warehouse applications and large scale analytics using innovative technologies such as vector execution model, dynamic data distribution and automatic load balancing.
XtremeData dbX Architecture
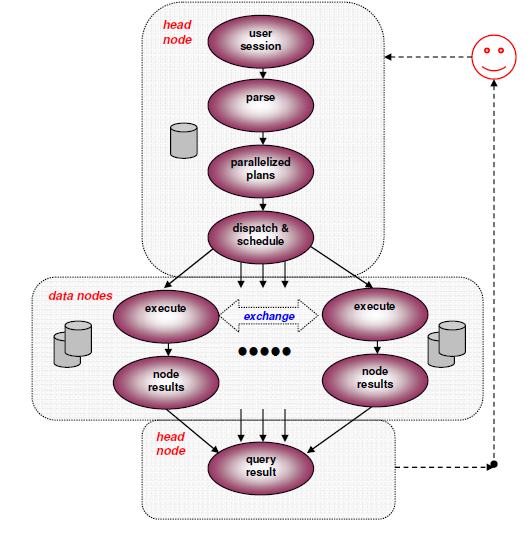
XtremeData dbX is a full SQL and ACID compliant database engine based on shared-nothing, massive parallel query execution. The underlying technology relies on PostgreSQL (similarly to AWS Redshift). In essence, the key architecture components are the head node and multiple data nodes – this is a fairly common patterns in massive parallel execution scenarios.
The head node manages the client connections, parses and plans the queries and sends the result back to the clients. The data nodes manage data storage and execute queries.
XtremeData dbX in AWS cloud
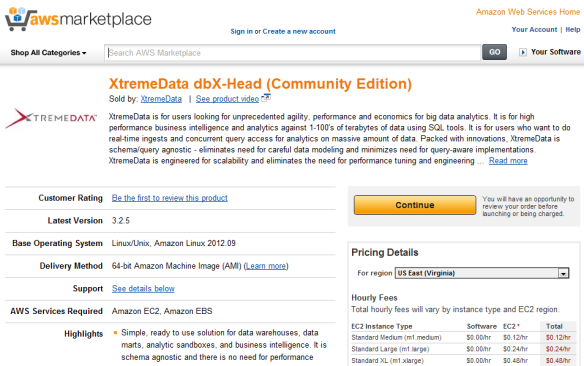
Besides the on-premise deployment option, XtremeData dbX is available in AWS cloud. We need to go to AWS Marketplace to register for it.There are different editions; one for dbX Head and another for dbX Data nodes.
XtremeData provides a document how to setup dbX head and data nodes in the AWS cloud but I decided to implement AWS CloudFormation templates to make the deployment easier. Since there are two different AMIs for head and data nodes, I created two templates.
The AWS CloudFormation dbX-Head template:
{
  "AWSTemplateFormatVersion": "2010-09-09",
  "Description": "XtremeData dbX-Head CloudFormation",
  "Parameters" : {
    "ClusterName" : {
      "Description" : "Name of the XtremeData Cluster",
      "Type" : "String",
      "MinLength": "1",
      "MaxLength": "64",
      "AllowedPattern" : "[-_ a-zA-Z0-9]*",
      "ConstraintDescription" : "can contain only alphanumeric characters, spaces, dashes and underscores."
    },
    "KeyName" : {
      "Description" : "Name of an existing EC2 KeyPair to enable SSH access to the instances",
      "Type" : "String",
      "MinLength": "1",
      "MaxLength": "64",
      "AllowedPattern" : "[-_ a-zA-Z0-9]*",
      "ConstraintDescription" : "can contain only alphanumeric characters, spaces, dashes and underscores."
    },
    "InstanceType" : {
        "Description" : "XtremeData dbX-Head EC2 instance type",
        "Type" : "String",
        "Default" : "m1.medium",
        "AllowedValues" : [ "m1.medium","m1.large","m1.xlarge","m2.xlarge","m2.2xlarge","m2.4xlarge", "c1.xlarge","hi1.4xlarge"],
        "ConstraintDescription" : "must be a valid EC2 instance type."
      }
  },
  "Mappings" : {
    "AWSRegion2AMI" : {
      "us-east-1"      : {"AMI" : "ami-4c2f5d25"},
      "us-west-2"      : {"AMI" : "ami-c127b7f1"},
      "us-west-1"      : {"AMI" : "ami-84cde4c1"}
    }
  },
  "Resources": {
    "XtremeDataSecurityGroup": {
      "Type": "AWS::EC2::SecurityGroup",
      "Properties": {
        "GroupDescription": "Enable XTremedata Access",
        "SecurityGroupIngress": [
          {
            "IpProtocol": "tcp",
            "FromPort": "22",
            "ToPort": "22",
            "CidrIp": "0.0.0.0/0"
          }
        ]
      }
    },
	"XtremeDataSecurityGroupIngress" : {
	   "Type": "AWS::EC2::SecurityGroupIngress",
	   "Properties": {
            "GroupName": { "Ref": "XtremeDataSecurityGroup" },
            "IpProtocol": "tcp",
            "FromPort": "0",
            "ToPort": "65535",
            "SourceSecurityGroupName": { "Ref": "XtremeDataSecurityGroup" }
       }
	},
    "XtremeDataHeadInstance": {
      "Type": "AWS::EC2::Instance",
      "Properties": {
		"UserData" : { "Fn::Base64" : { "Ref" : "ClusterName" }},
        "SecurityGroups": [ { "Ref": "XtremeDataSecurityGroup" } ],
		"ImageId" : { "Fn::FindInMap" : [ "AWSRegion2AMI", { "Ref" : "AWS::Region" }, "AMI" ]},
        "InstanceType": {"Ref" : "InstanceType"},
        "KeyName": { "Ref" : "KeyName" },
		"BlockDeviceMappings" : [
               {
                  "DeviceName" : "/dev/sdf",
                  "Ebs" : {
                     "VolumeType" : "standard",
                     "DeleteOnTermination" : "true",
                     "VolumeSize" : "100"
                  }
               },
               {
                  "DeviceName" : "/dev/sdg",
                  "Ebs" : {
                     "VolumeType" : "standard",
                     "DeleteOnTermination" : "true",
                     "VolumeSize" : "100"
                  }
               },
			   {
                  "DeviceName" : "/dev/sdh",
                  "Ebs" : {
                     "VolumeType" : "standard",
                     "DeleteOnTermination" : "true",
                     "VolumeSize" : "100"
                  }
               },
               {
                  "DeviceName" : "/dev/sdi",
                  "Ebs" : {
                     "VolumeType" : "standard",
                     "DeleteOnTermination" : "true",
                     "VolumeSize" : "100"
                  }
               }
            ],
        "Tags" : [
          { "Key" : "Name", "Value" : "XtremeData dxX-Head"}
        ]
      }
    }
  }
}
This will create the security group for dbX node communications, define userdata (cluster name) and allocate 4 EBS volumes (100 GB each) to dbX Head node.
The AWS CloudFormation dbX-Data template looks as follows:
{
  "AWSTemplateFormatVersion": "2010-09-09",
  "Description": "XtremeData dbX-Data CloudFormation",
  "Parameters" : {
    "ClusterNameAnddbXHead" : {
      "Description" : "Name of the XtremeData Cluster and the dbX-Head EC2 hostname concatenated with semi-colon",
      "Type" : "String",
      "MinLength": "1",
      "MaxLength": "64"
    },
	"XtremeSecurityGroup" : {
      "Description" : "Name of the XtremeData SecurityGroup",
      "Type" : "String",
      "MinLength": "1",
      "MaxLength": "64",
      "AllowedPattern" : "[-_ a-zA-Z0-9]*",
      "ConstraintDescription" : "can contain only alphanumeric characters, spaces, dashes and underscores."
    },
	"NumberOfDataNodes" : {
      "Description" : "Max. Number of Xtreme Data Instances to start (in addition to the Head Instance)",
      "Type" : "Number",
      "Default" : "2"
    },
    "HeadAvailZone" : {
      "Description" : "Name of the Availability Node where dbX-Head instance is running",
      "Type" : "String",
	  "MinLength": "1",
      "MaxLength": "64",
      "AllowedPattern" : "[-_ a-zA-Z0-9]*",
      "ConstraintDescription" : "can contain only alphanumeric characters, spaces, dashes and underscores."
    },
    "KeyName" : {
      "Description" : "Name of an existing EC2 KeyPair to enable SSH access to the instances",
      "Type" : "String",
      "MinLength": "1",
      "MaxLength": "64",
      "AllowedPattern" : "[-_ a-zA-Z0-9]*",
      "ConstraintDescription" : "can contain only alphanumeric characters, spaces, dashes and underscores."
    },
    "InstanceType" : {
        "Description" : "XtremeData dbX-Data EC2 instance type",
        "Type" : "String",
        "Default" : "m1.large",
        "AllowedValues" : [ "m1.large","m1.xlarge","m2.xlarge","m2.2xlarge","m2.4xlarge", "c1.xlarge","hi1.4xlarge"],
        "ConstraintDescription" : "must be a valid EC2 instance type."
      }
  },
  "Mappings" : {
    "AWSRegion2AMI" : {
      "us-east-1"      : {"AMI" : "ami-442c5e2d"},
      "us-west-2"      : {"AMI" : "ami-1d28b82d"},
      "us-west-1"      : {"AMI" : "ami-66cce523"}
    }
  },
  "Resources": {
    "XtremeDataNodeGroup" : {
      "Type" : "AWS::AutoScaling::AutoScalingGroup",
      "Properties" : {
        "AvailabilityZones" : [ { "Ref" : "HeadAvailZone" } ],
        "LaunchConfigurationName" : { "Ref" : "DataNodeLaunchConfig" },
        "MinSize" : "0",
        "MaxSize" : {"Ref" : "NumberOfDataNodes"},
		"DesiredCapacity" : {"Ref" : "NumberOfDataNodes"},
        "Tags" : [
          { "Key" : "Name", "Value" : "XtremeData dbX-Data", "PropagateAtLaunch" : "true" }
        ]
      }
    },

	"DataNodeLaunchConfig" : {
       "Type" : "AWS::AutoScaling::LaunchConfiguration",
	   "Properties": {
	      "UserData" : { "Fn::Base64" : { "Ref" : "ClusterNameAnddbXHead" }},
          "KeyName" : { "Ref" : "KeyName" },
          "SecurityGroups" : [ { "Ref" : "XtremeSecurityGroup" } ],
          "InstanceType" : { "Ref" : "InstanceType" },
		  "ImageId" : { "Fn::FindInMap" : [ "AWSRegion2AMI", { "Ref" : "AWS::Region" }, "AMI" ]},
		  "BlockDeviceMappings" : [
               {
                  "DeviceName" : "/dev/sdf",
                  "Ebs" : {
                     "VolumeType" : "standard",
                     "DeleteOnTermination" : "true",
                     "VolumeSize" : "100"
                  }
               },
               {
                  "DeviceName" : "/dev/sdg",
                  "Ebs" : {
                     "VolumeType" : "standard",
                     "DeleteOnTermination" : "true",
                     "VolumeSize" : "100"
                  }
               },
			   {
                  "DeviceName" : "/dev/sdh",
                  "Ebs" : {
                     "VolumeType" : "standard",
                     "DeleteOnTermination" : "true",
                     "VolumeSize" : "100"
                  }
               },
               {
                  "DeviceName" : "/dev/sdi",
                  "Ebs" : {
                     "VolumeType" : "standard",
                     "DeleteOnTermination" : "true",
                     "VolumeSize" : "100"
                  }
               }
          ]
		}
    }
  }
}
This template uses cluster name and AWS EC2 hostname concatenated with ; for userdata, it also uses the availability zones for dbX Head node and the security group that we just defined for dbX Head node. In addition, it allows to define the number of data nodes – it will be used to configure an auto-scaling group to ensure that we have the requested amount of data instances running.
CAUTION: Please, note that it is not enough just to terminate the nodes if you have auto-scaling defined since AWS will initiate new nodes. We need to terminate the instances using as-terminate-instance-in-auto-scaling-group command and then delete the auto-scaling config with as-delete-auto-scaling-group and as-delete-launch-config. More information about AWS auto-scaling can be found here.
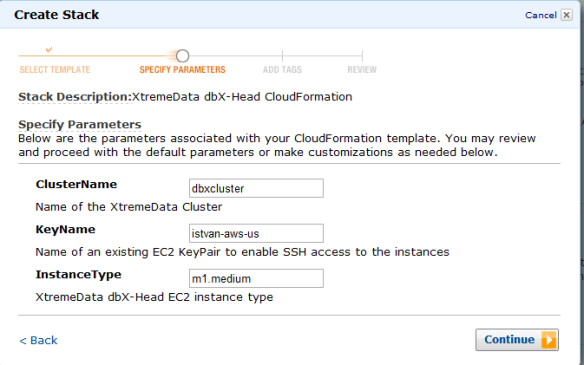
To start an XtremeData dbX Head node, we need to go to AWS console Cloud Formation section, then select Create Stack:
Once we submit the configuration, the status will become CREATE_IN_PROGRESS and then after a while CREATE_COMPLETE.
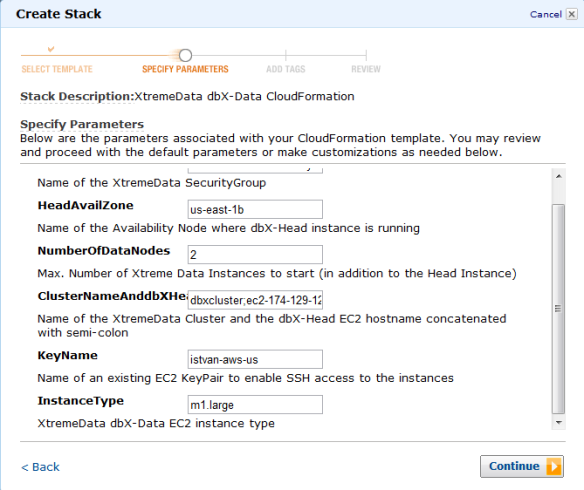
Then we can create another stack for the data nodes using the second CloudFormation template:
After a while we should see one head node and the requested number of datanodes running in AWS EC2 console:
Creating a database in ExtremeData dbX
Once we have fired up the nodes, we can login to the head node as ec2-user using ssh (or e.g. putty on Windows).
First we need to initiate the cluster (please, note that this is a destructive operation, no data will be preserved), then start the cluster and the dbX database engine:
[ec2-user@ip-10-224-122-90 home]$ cluster_init -i 2
init started
examining nodes
initializing head ebs disks: xvdf xvdg xvdh xvdi
mdadm: Defaulting to version 1.2 metadata
mdadm: array /dev/md0 started.
mkfs.xfs: Specified data stripe unit 512 is not the same as the volume stripe unit 128
initializing node ebs disks: xvdf xvdg xvdh xvdi
clearing head ephemeral disks
clearing nodes ephemeral disks
cluster_init done

[ec2-user@ip-10-224-122-90 home]$ cluster_start
initializing head ephemeral disks
  head ephemeral disks:  xvdb
    raid-ing
mdadm: /dev/xvdb appears to contain an ext2fs file system
    size=419395584K  mtime=Sat Jul  6 21:52:00 2013
mdadm: Defaulting to version 1.2 metadata
mdadm: array /dev/md1 started.
mkfs.xfs: Specified data stripe unit 512 is not the same as the volume stripe unit 128
mkfs.xfs: Specified data stripe width 512 is not the same as the volume stripe width 128
examining nodes
assembling node EBSs: xvdf xvdg xvdh xvdi
initializing node tmp disks: xvdb xvdc
  raid-ing
cluster_start done

[ec2-user@ip-10-224-122-90 home]$ dbx_start
new dbx installation initialized
Initializing kernel nfsd:                                  [  OK  ]
Starting NFS services:                                     [  OK  ]
Starting NFS mountd:                                       [  OK  ]
Stopping RPC idmapd:                                       [  OK  ]
Starting RPC idmapd:                                       [  OK  ]
Starting NFS daemon:                                       [  OK  ]
rpc.svcgssd is stopped
rpc.mountd (pid 3402) is running...
nfsd (pid 3467 3466 3465 3464 3463 3462 3461 3460) is running...
Generating binary repository file ...
file 'xdapp.conf2.txt.conf0' generated.
starting dbx nodes
Starting xdu daemon...                                     [  OK  ]
dbx startup done
[ec2-user@ip-10-224-122-90 home]$
[ec2-user@ip-10-224-122-90 home]$
Now we can login as dbxdba user (we can do it again with ssh or putty since the key is copied over from ec2-user). Then we need to change the dbxdba password (using passwd Linux commad) in order to be able to login using dbX tools.
Now we are ready to create a server and once the server is created, we can then create a database. The simplest way to manage the database and run SQL queries is to use a command line tool called xdudb:
$ xdudb create aws_server 32145
||==================||

[dbxdba@ip-10-224-122-90 ~]$ xdudb list
||==================||
aws_server
[dbxdba@ip-10-224-122-90 ~]$ xdudb status
||==================||
ip-10-224-122-90 configuration: 1 head node and 2 data nodes
running dbx services          : 1 head node and 2 data nodes

[dbxdba@ip-10-224-122-90 ~]$ xdudb start aws_server
||==================||

[dbxdba@ip-10-224-122-90 ~]$ xdudb info aws_server
||==================||
Name        : aws_server
NodeSet     : Default_NS
Owner       : dbxdba
Port        : 32145
H|0   |head    |10.224.122.90  |head |/volumes/data/dbstore/dbxdba/aws_server/head
D|1   |node00  |10.154.137.31  |n0   |/hd/dbxdba/aws_server/n0
D|2   |node01  |10.165.7.225   |n1   |/hd/dbxdba/aws_server/n1

[dbxdba@ip-10-224-122-90 ~]$ xdudb dbcreate aws_server aws_db
CREATE DATABASE
Now we can create a table, insert some rows and run select statements.
[dbxdba@ip-10-224-122-90 ~]$ xdudb sql aws_server aws_db
Welcome to dbX psql 3.2.5, the interactive SQL terminal.

Type:  \copyright for distribution terms
       \h for help with SQL commands
       \? for help with psql commands
       \g or terminate with semicolon to execute query
       \q to quit

aws_db=# CREATE TABLE products (
aws_db(# product_no INTEGER,
aws_db(# name VARCHAR(30),
aws_db(# price NUMERIC(10,2)
aws_db(# );
CREATE TABLE
aws_db=# INSERT INTO products VALUES(1, 'Product1', 100.00);
INSERT 0 1
aws_db=# SELECT * FROM products;
 product_no |   name   | price
------------+----------+--------
          1 | Product1 | 100.00
(1 row, Query Total: 1)
WIth the help of the xdudb command line tool we can check dbX version, check disk usage and mounted filesystems, etc.
[dbxdba@ip-10-224-122-90 ~]$ xdudb version
ip-10-224-122-90        2013-07-07 00:03:10
  DB           : dbX SQL 3.2.5
               : fpga.run r4347
  command line : xdudb 1.4
  GUI          : xdadm 3.0.2
  daemon       : xdutils 4.5.8
  OS           : Linux 3.4.43-43.43.amzn1.x86_64

[dbxdba@ip-10-224-122-90 ~]$ xdudb  du aws_server
||==================||
H|0   |head    |10.224.122.90  |head |60M  |/volumes/data/dbstore/dbxdba/aws_server/head
D|1   |node00  |10.154.137.31  |n0   |58M  |/hd/dbxdba/aws_server/n0
D|2   |node01  |10.165.7.225   |n1   |58M  |/hd/dbxdba/aws

[dbxdba@ip-10-224-122-90 ~]$ xdudb  df
head : 10.224.122.90
Filesystem            Size  Used Avail Use% Mounted on
/dev/md0              400G   95M  400G   1% /volumes/data
node00 : 10.154.137.31
Filesystem            Size  Used Avail Use% Mounted on
/dev/md0              400G   93M  400G   1% /volumes/data
node01 : 10.165.7.225
Filesystem            Size  Used Avail Use% Mounted on
/dev/md0              400G   93M  400G   1% /volumes/data
xdAdm web based management GUI
In addition to the command line tool that we described in the AWS cloud deployment scenario, there is also a web base GUI to manage the applicance – it is based on Apache Tomcat. We just go to http://dbx-headnode:8080/xdadm url and login. The we can manage the servers and databases, check nodesets and monitor the system:
XtremeData dbX virtual machine
If someone just wants to try out dbX database engine then she can download a virtual machine from XtremeData web site. The instance can be run e.g using vmplayer. Once the user logged in to the virtual machine as dbxdba, he can startup a server:
$ xdudb start dbxtest


