Introduction
Mobile Backend as a Service (MBaaS) solutions intend to reduce the complexity of mobile application development by offering cloud storage, authentication, push notification and similar type of services. They rely on RESTful programming interface to access data (Create/Read/Update/Delete operations based on HTTP GET/PUT/POST/DELETE methods) and offer authentication services using OAuth protocol. The vendors also tend to offer Software Development Kits for various platforms like iOS, Android, Windows Phone, etc. This is the common framework offered by the MBaaS providers for mobile application developers to accelerate the development. There are many service provides in this arena such as Kinvey, StackMob, Appcelerator and the major cloud players a such as Salesforce.com (see Database.com post), Google and Microsoft also have their own offering. In this post we are going to introduce Windows Azure Mobile Service as a cloud based backend database for mobile applications.
Getting Started with Azure Mobile Services
We will demonstrate how to write a simple Android application using Azure Mobile Services as cloud backend database to store contact details (name, email address, phone number) and we will also show how to introduce authentication in order to protect our data and let only authenticated users access it.
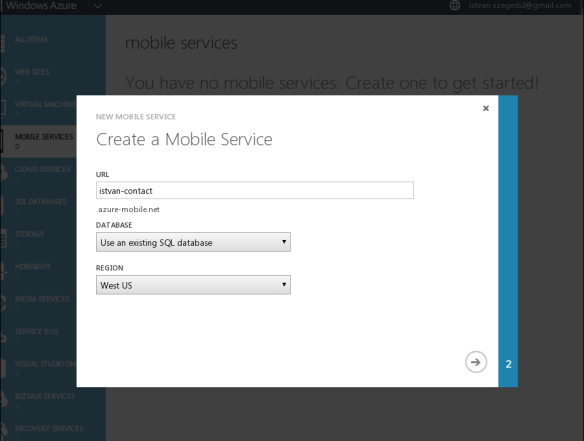
Assuming that we have already signed up for Windows Azure services, we need to log in to the Azure Management Portal and click on the Mobile Services icon. This will bring up a form where we need to provide our URL (that will be postfixed with .azure-mobile.net domain), the database name and the region (as of writing the article, we can select from West US, East US, North Europe and East Asia).
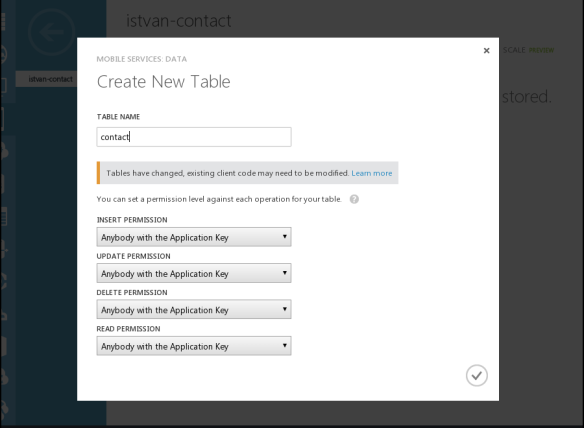
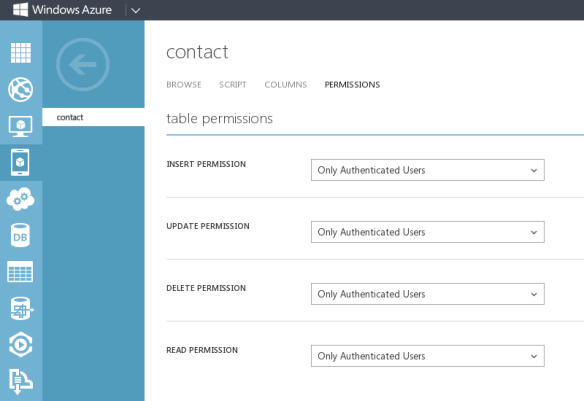
The next step is to create our SQL table. We can click on Data menu, provide the name for our table an define the access permissions for each operation type such as insert, update, delete and read.
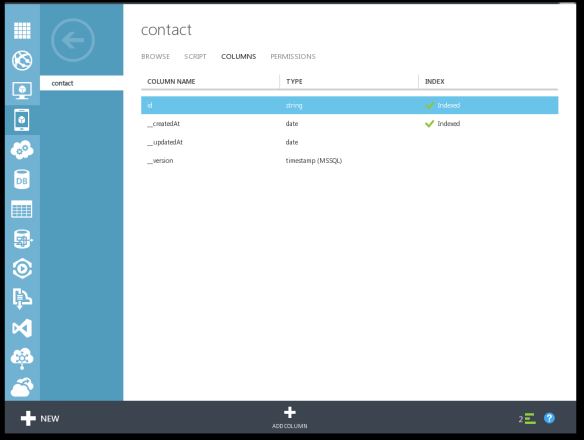
As a result, we will have a base table with a few predefined columns such as id, _createdAt , _version that are generated by Azure Mobile Services automatically.
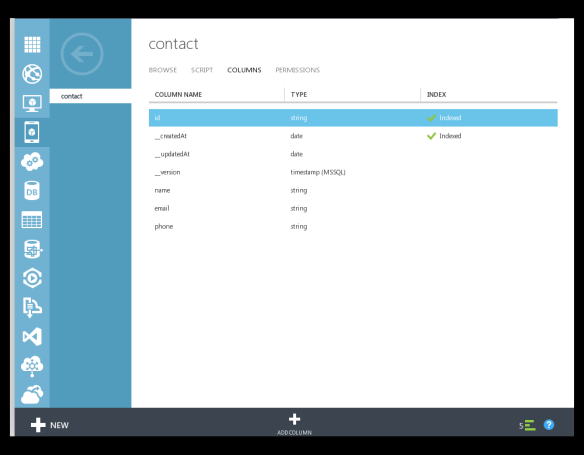
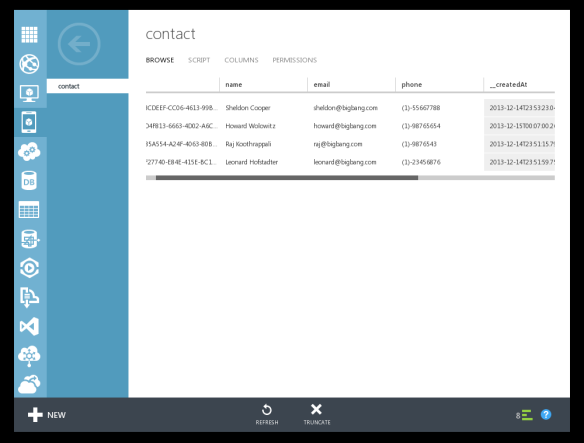
We can then add our columns such as name, email and phone to this table using Add Column (+) menu at the bottom of the management console. The figure below shows the contact table that is going to be used by our Android application. Our cloud backend layer is ready to use now.
The Mobile Client
Windows Azure Mobile Services support the popular most platforms such as iOS, Android, Windows Phone or HTML/Javascript. For this post we have developed a simple Android application to demonstrate how to store contact details in the cloud. The Mobile Services SDKs can be downloaded from the Windows Azure Developer Tools for Mobile Service webpage. As of writing the post, the Android SDK version is 1.1.0.
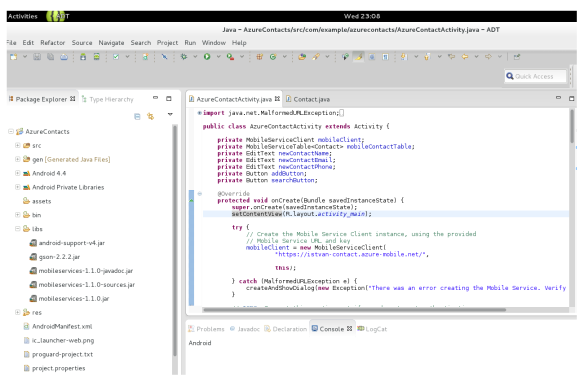
The first step is to create an Android project from the Android Developer Tools (ADT). Then we need to unzip the Mobile Service SDK for Android and copy all the jar files under mobileservices directory to the libs directory under our project named AzureContact.
Then we can start writing our code. The application has two classes; the main activity class is called AzureContactActivity.java and the entity class that describes the data entity is called Contact.java. Below is the code for these classes.
AzureContactActivity.java:
import java.net.MalformedURLException;
import java.util.List;

import com.example.azurecontacts.Contact;

import com.microsoft.windowsazure.mobileservices.MobileServiceClient;
import com.microsoft.windowsazure.mobileservices.MobileServiceTable;
import com.microsoft.windowsazure.mobileservices.ServiceFilterResponse;
import com.microsoft.windowsazure.mobileservices.TableOperationCallback;
import com.microsoft.windowsazure.mobileservices.TableQueryCallback;

import com.microsoft.windowsazure.mobileservices.MobileServiceUser;
import com.microsoft.windowsazure.mobileservices.UserAuthenticationCallback;
import com.microsoft.windowsazure.mobileservices.MobileServiceAuthenticationProvider;

import android.os.Bundle;
import android.app.Activity;
import android.app.AlertDialog;
import android.view.Menu;
import android.view.View;
import android.widget.Button;
import android.widget.EditText;

public class AzureContactActivity extends Activity {

    private MobileServiceClient mobileClient;
    private MobileServiceTable mobileContactTable;
    private EditText newContactName;
    private EditText newContactEmail;
    private EditText newContactPhone;
    private Button addButton;
    private Button searchButton;

	@Override
	protected void onCreate(Bundle savedInstanceState) {
		super.onCreate(savedInstanceState);
		setContentView(R.layout.activity_main);

		try {
			// Create the Mobile Service Client instance, using the provided
			// Mobile Service URL and key
			mobileClient = new MobileServiceClient(
					"https://istvan-contact.azure-mobile.net/",
					"XXXXXXXXXXXXXXXXXXXXXXXX",
					this);

		} catch (MalformedURLException e) {
			createAndShowDialog(new Exception("There was an error creating the Mobile Service. Verify the URL"), "Error");
		}

		// TODO: Comment this section out if you do not want authentication
		/*
                mobileClient.login(MobileServiceAuthenticationProvider.MicrosoftAccount,
		        new UserAuthenticationCallback() {

		            @Override
		            public void onCompleted(MobileServiceUser user,
		                    Exception exception, ServiceFilterResponse response) {
		                if (exception == null) {
		                    createContactTable();
		                } else {
		                    createAndShowDialog("You must login.", "Error");
		                    return;
		                }
		            }
		        });
		 */

		// TODO: Uncomment this section if you do not want authentication
		createContactTable();

	}

	@Override
	public boolean onCreateOptionsMenu(Menu menu) {
		// Inflate the menu; this adds items to the action bar if it is present.
		getMenuInflater().inflate(R.menu.main, menu);
		return true;
	}

	public void createContactTable() {
		mobileContactTable = mobileClient.getTable(Contact.class);
	    newContactName = (EditText) findViewById(R.id.name);
	    newContactEmail = (EditText) findViewById(R.id.email);
	    newContactPhone= (EditText) findViewById(R.id.phone);
	    addButton = (Button) findViewById(R.id.addButton);
	    searchButton = (Button) findViewById(R.id.searchButton);
	    addButton.setOnClickListener( new Button.OnClickListener() {
		    public void onClick(View v) {
                addContact(v);
		    }
	    });

	    searchButton.setOnClickListener( new Button.OnClickListener() {
		    public void onClick(View v) {
                searchContact(v);
		    }
	    });
    }

	public void addContact(View view) {

		// Create a new contact
		Contact contact = new Contact();

		contact.setName(newContactName.getText().toString());
		contact.setEmail(newContactEmail.getText().toString());
		contact.setPhone(newContactPhone.getText().toString());

		// Insert the new contact
		mobileContactTable.insert(contact, new TableOperationCallback() {

			public void onCompleted(Contact entity, Exception exception, ServiceFilterResponse response) {

				if (exception != null) {
					createAndShowDialog(exception, "Error");
				}

			}
		});
	}

	private void searchContact(View view) {
		String name = newContactName.getText().toString();
		// Search for the contact based on the name field
		mobileContactTable.where().field("name").eq(name).execute(new TableQueryCallback() {
		    public void onCompleted(List result, int count, Exception exception, ServiceFilterResponse response) {
		    	if (exception == null) {
		    		if ( !result.isEmpty() ) {
		    			newContactName.setText(result.get(0).getName());
					    newContactEmail.setText(result.get(0).getEmail());
					    newContactPhone.setText(result.get(0).getPhone());
		    		}

				} else {
					createAndShowDialog(exception, "Error");

	     		}
			}
		});
	}

	private void createAndShowDialog(Exception exception, String title) {
		createAndShowDialog(exception.toString(), title);
	}

	private void createAndShowDialog(String message, String title) {
		AlertDialog.Builder builder = new AlertDialog.Builder(this);

		builder.setMessage(message);
		builder.setTitle(title);
		builder.create().show();
	}
}
Contact.java:
package com.example.azurecontacts;

public class Contact {
	@com.google.gson.annotations.SerializedName("id")
	private String cId;

	@com.google.gson.annotations.SerializedName("name")
	private String cName;

	@com.google.gson.annotations.SerializedName("email")
	private String cEmail;

	@com.google.gson.annotations.SerializedName("phone")
	private String cPhone;

	/**
	 * Contact constructor
	 */
	public Contact() {

	}

	/**
	 * Initializes a new Contact
	 *
	 * @param name
	 *            The contact name
	 * @param email
	 *            The contact email
	 * @param phone
	 *            The contact phone
	 * @param id
	 *            The item id
	 */
	public Contact(String name, String email, String phone, String id) {
		this.setName(name);
		this.setEmail(email);
		this.setPhone(phone);
		this.setId(id);
	}

	/**
	 * Returns the contact name
	 */
	public String getName() {
		return cName;
	}

	/**
	 * Sets the contact name
	 *
	 * @param name
	 *            name to set
	 */
	public final void setName(String name) {
		cName = name;
	}

	/**
	 * Returns the contact email
	 */
	public String getEmail() {
		return cEmail;
	}

	/**
	 * Sets the contact email
	 *
	 * @param email
	 *            email to set
	 */
	public final void setEmail(String email) {
		cEmail = email;
	}

	/**
	 * Returns the contact phone
	 */
	public String getPhone() {
		return cPhone;
	}

	/**
	 * Sets the contact phone
	 *
	 * @param phone
	 *             phone to set
	 */
	public final void setPhone(String phone) {
		cPhone = phone;
	}

	/**
	 * Returns the item id
	 */
	public String getId() {
		return cId;
	}

	/**
	 * Sets the item id
	 *
	 * @param id
	 *            id to set
	 */
	public final void setId(String id) {
		cId = id;
	}

	@Override
	public boolean equals(Object o) {
		return o instanceof Contact && ((Contact) o).cId == cId;
	}

}
In the manifest file (AndroidManifest.xml) we need to make sure that we have INTERNET permission granted:
<uses-permission android:name="android.permission.INTERNET" />
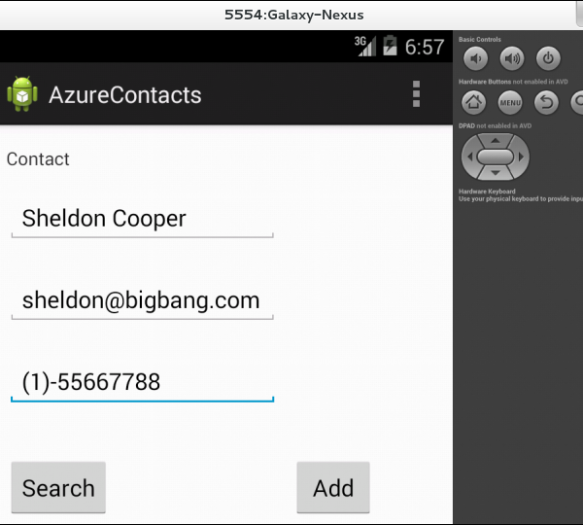
Now if we run our application, we can enter the new contact name, email and phone and submit the data by pressing the Add button.
The mobile application will execute the addContact() function that invokes mobileContactTable.insert(contact, … ) method to insert the data into the contact table store on Microsoft Azure cloud store.
If we enter a name into the empty form and click on Search button, the application will return the contact details for the given person. Under the hood our AzureContact application invokes searchContact() method that will call mobileContactTable.where().field(“name”).eq(name).execute(…)
This LINQ query will return the contact details if the value of column ‘name’ equals to the given name – similar to SELECT * FROM contact WHERE name = ‘Name’ SQL query.
The Azure Management Portal allows us to verify our data stored in the contact table.
Authentication for Azure Mobile Services
Azure Mobile Services also support OAuth authentication in order to restrict access to our data stored in the cloud. As of now, the supported authentication providers are Microsoft, Google, Twitter and Facebook.
In order to configure OAuth authentication for our Android application, we need to change the contact table permission to “Only Authenticated users”.
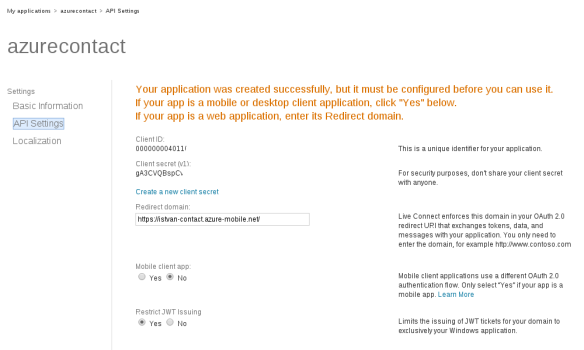
Then we need to go to our preferred authentication provider’s website, in the example we are going to use Microsoft Account. This webpage describes how to register your application with Microsoft Account.
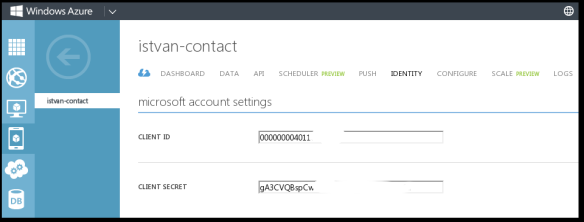
After this step we need to configure the client id and client secret under our mobile service in Azure Management Portal (see Identity menu).
And finally we need to modify our Android application (AzureContactActivity.java) to invoke the Mobile Services login function, se TODO comment in the code:
        @Override
	protected void onCreate(Bundle savedInstanceState) {
        ....
        ....
                // TODO: Comment this section out if you do not want authentication
		mobileClient.login(MobileServiceAuthenticationProvider.MicrosoftAccount,
		        new UserAuthenticationCallback() {

		            @Override
		            public void onCompleted(MobileServiceUser user,
		                    Exception exception, ServiceFilterResponse response) {
		                if (exception == null) {
		                    createContactTable();
		                } else {
		                    createAndShowDialog("You must login.", "Error");
		                    return;
		                }
		            }
		        });

		// TODO: Uncomment this section if you do not want authentication
		//createContactTable();

          }
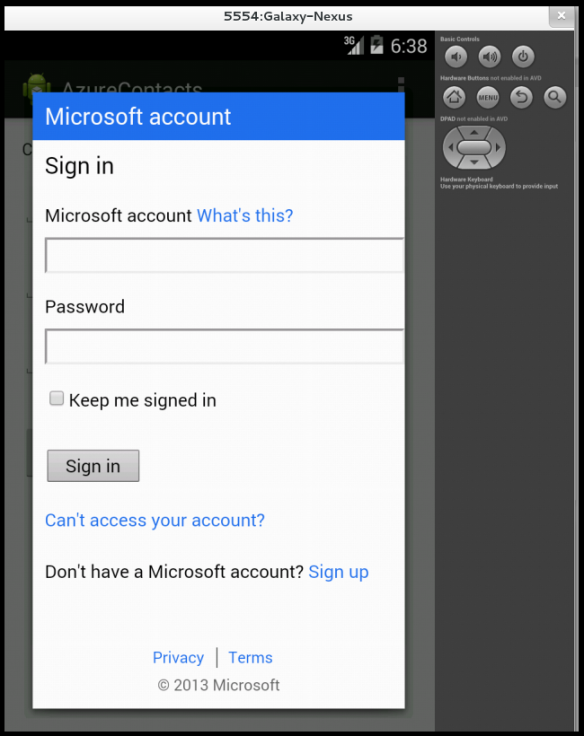
Now when we start our AzureContact mobile application, it will ask for username and password that has to be authenticated with Microsoft Account. Only after successful authentication can we search or add contact details.

